| Home | |
| Fossil | |
| None More Black | |
| Lego Inside | |
| Lego Case | |
| Overclocking | |

After my last upgrade, I donated my old Dell to my sister and took in their Packard Bell into my care. It was a Pentium-133 with a 1 GB hard drive and no sound. I had a spare keyboard and monitor from a used PC, so I had a full system. I threw in a network card, installed Windows 98, and brought it up on the network. Unfortunately, it wasn't really good for anything, so it sat there.
I've also been trying to get fast Internet access to our house. I had a terrible experience with DSL earlier this year. I just tried again, however, and it's supposedly available. It's looking like I probably will hook up the Lego Firewall, possibly in the near future. A firewall, for the non-technical, is a computer dedicated to preventing hackers from getting access to your network. In this case, it would hopefully prevent the two other computers from being broken into.
The main goal of this case mod was to have a smaller and lighter case than the big, clunky case that came with the Packard Bell. I knew from the start that I wanted to incorporate Legos into the design, and I'd picked up some bulk Legos. The initial prototypes, however, had some problems . . .
Unfortunately, it didn't work out very well. It was difficult to cut smoothly with the tools I had. It was quite brittle and would break if I applied too much force. Finally, it was non-conductive and neither grounded nor shielded the equipment. I gave that up and decided to build a metal box from scratch. Pretty dumb in retrospect, but what did I know?
I picked up some sheet metal and assorted tools to my dad's house. He explained that I really didn't want to do this and that it was much easier to buy one. Dutifully, though, he broke out his assorted tools and began measuring, cutting, and welding while I watched Sam play with assorted equipment. Fairly soon, a box took shape.
It seemed much more sturdy, but appeared pretty difficult to work with (in terms of cutting holes for fans, power supply, and switches). It also wouldn't fit in one of the shelves in the antique library table I had for my computer desk. I was prepared to use it, but I wondered if there were a better solution.
Little did I know, I had the answer staring right at me.
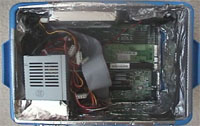
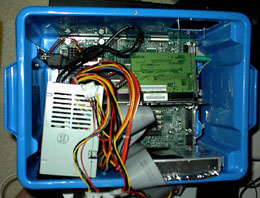
For the Lego case, I had picked up a couple large cases of bulk Legos for really cheap ($25 or so). Just out of curiosity, I slid the motherboard into the bigger of the two. It fit perfectly.
 I spent a good deal of time figuring out just how to position the power supply and other components,
as it would clearly be a tight squeeze. After much deliberation, I whipped out a utility knife
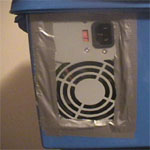
and hacked out some holes for the fan, power supply, and cable connections.
I spent a good deal of time figuring out just how to position the power supply and other components,
as it would clearly be a tight squeeze. After much deliberation, I whipped out a utility knife
and hacked out some holes for the fan, power supply, and cable connections.
 I put insulative paper under the motherboard, taped down tin foil (to block RF and ground everything),
and started assembling the pieces with duct tape, some well placed screws, and conductive heating duct tape.
I drilled and cut holes for the power switch and LEDs in front. It was all a bit messy, but I planned
on covering the tape with Legos, so I wasn't too worried.
I put insulative paper under the motherboard, taped down tin foil (to block RF and ground everything),
and started assembling the pieces with duct tape, some well placed screws, and conductive heating duct tape.
I drilled and cut holes for the power switch and LEDs in front. It was all a bit messy, but I planned
on covering the tape with Legos, so I wasn't too worried.
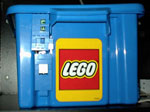
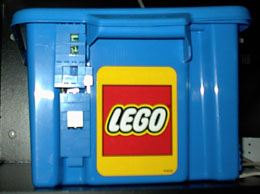
Next, armed with glue gun (Jamie's idea), I put together some Legos and began the final touches.
I plugged away at the project for another couple weeks after the last page. Things seemed to be slowly coming together. I got it on the network. I glued on most of the Legos (twice, as Sam managed to destroy them, saying "what's that?" as he wrecked devistation). Finally, I wanted a sound card, which my friend Jim happily donated. All looked sweet, until the problems started.
It was a simple problem, yet probably completely unfixable - it wouldn't boot up. The hard drive would spin and the lights came on, but that's all. I'd remove the whole thing, check for improper grounding, and try again. Still nothing. Odds are, I somehow cooked the motherboard, either due to physical stress (cramming it into a small case) or shorting out something bad.
And so this sad tale is over. I still cringe internally when Sam says "Where's my own special computer?" Thankfully, the memory of an almost two year old is short, and he's probably getting more enjoyment out of the Legos I bought in the first place.
Several months passed after the last entry. I was cleaning out my closets and decided to give the Lego computer one more try. Amazingly, it booted up with no problems. My case mod fervor revived, I began putting the pieces together again. Much of the Lego components had already been removed and assimilated into my son's Lego box, so I picked them out and reassembled the pieces. This time, I drilled holes and screwed it into the case as part of the "2-year-old proofing" the Lego case required.
I ordered a Sound card, added a CD-ROM that was laying around, and it was ready to go.
All is lost. The intermittent problems that I thought were solved started up again. After awhile, I gave up and junked it all. I pried out the CPU and added to the "wall of shame" (currently a 486 and Pentium CPU). Still, my experience did help when I began the Lego Inside case.
Back to case modifications
The Lego Case
front
top