| Home | |
| Fossil | |
| None More Black | |
| Lego Inside | |
| Lego Case | |
| Overclocking | |

The most critical piece of any case modification is making sure you have enough time to do it. It takes a huge amount of time. Way more than any reasonable person would spend working on something. Sure, you can grab a spray can and glom on some paint, but the true artiste aims for perfection. Because of this, I waited until my wife and son were out of the house for five days.
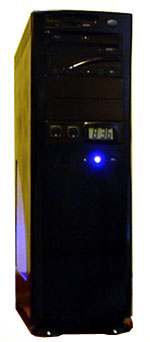
The first step was disassembling the case. I have an AOpen HX08 full tower, so it's a fair bit of case to haul around. I also made a trip to the hardware store for paint, sandpaper, Lucite (a type of sturdy clear plastic). The next trip was to my dad's house. He does a lot of work with model boats, so he's got the best tools.
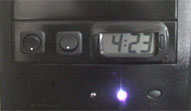
He cut open a good sized hole in one side with a jigsaw, filed down the sharp edges, and I sanded the case. While we were there, we also started work on the bay modification. This is a little panel on the front of the computer that had two switches and a clock. The clock was for pratical reasons - there's no clock in my office and no easy way to tell what time it is when I'm playing games. Basically, we took a 5 1/4" bay cover, drilled two holes for the switches and glued in the clock. Gluing in the clock was tremendously difficult, as it involved superglue, epoxy, and bondo, as well as lots of sanding to make it look nice.
While we were there, he also cut out the Lucite. It's a hard, clear plastic that would be the "window" to my new case.
Next, it was back home to paint and assemble the pieces.
The next couple days were the worst. My computer was basically in pieces and I had to hold off playing Diablo II until I was done with everything. Case parts covered all available counter space in the kitchen (remember to wait until your wife is gone!). It was a big mess. Just yesterday, Jamie found some wire that had fallen into one of the burners on the stove. Must have been from one of the soldering projects.
Painting was very tedious. It was critical that only a thin layer of paint was applied to the case, otherwise it would run and I'd have to sand it down again. Sometimes dust would blow on the paint or I'd touch something accidentally. In these cases, I'd sand it down with 400 grit and paint again.
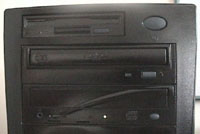 The other hard part was painting the front of the drives (a floppy, a CD RW, and a DVD drive).
Instead of disassembling them completely, I creatively used tape and plastic wrap to mask off
the critical components. Once I had two or three layers of glossy black paint on everything, I covered it all with
clear plastic enamel. Finally, I touched up the buttons with some Midnight Blue paint with a brush.
The other hard part was painting the front of the drives (a floppy, a CD RW, and a DVD drive).
Instead of disassembling them completely, I creatively used tape and plastic wrap to mask off
the critical components. Once I had two or three layers of glossy black paint on everything, I covered it all with
clear plastic enamel. Finally, I touched up the buttons with some Midnight Blue paint with a brush.
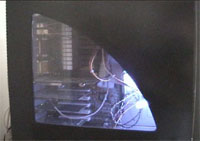 After the paint dryed, I took the Lucite window and glued it on with silicon glue. I stacked
some old college text books on it (I knew they were good for something), and let it dry over night.
After the paint dryed, I took the Lucite window and glued it on with silicon glue. I stacked
some old college text books on it (I knew they were good for something), and let it dry over night.
While all of the painting was going on, I had some simple elecronics to do.
The final pieces of my case modification were electronic in nature. Most of the ideas here came from Virtual Hideout.
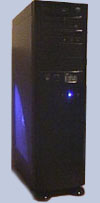
 Changing out the LEDs in the front was amazingly simple to do and it produced a nice effect.
Basically, I cut off the existing LEDs on the power and HD lights and soldered on some bright
blue LEDs from Radio Shack. Pretty cheap and very cool looking.
Changing out the LEDs in the front was amazingly simple to do and it produced a nice effect.
Basically, I cut off the existing LEDs on the power and HD lights and soldered on some bright
blue LEDs from Radio Shack. Pretty cheap and very cool looking.
 I also made a "baby bus". This is a little box attached to a front panel with two switches.
Once was going to the neon light and the next was going to some rear fans. The hard part
was mechanically attaching everything together. I mounted the spring connectors on the back
of the clock using motherboard offsets. Then it was creatively using the insulative heat shrink
tubes and solder to connect it all.
I also made a "baby bus". This is a little box attached to a front panel with two switches.
Once was going to the neon light and the next was going to some rear fans. The hard part
was mechanically attaching everything together. I mounted the spring connectors on the back
of the clock using motherboard offsets. Then it was creatively using the insulative heat shrink
tubes and solder to connect it all.
The next day, the neon light came it. It was a 10" light/transformer combination that was designed to plug into your car lighter. I snipped off the car lighter adapter and plugged it into the baby bus. It took some time finding the perfect placement, but eventually I achieved a location that bathed the PCI cards in an eerie blue glow.
Finally, I hooked up a spare fan to the second switch for the added cooling. My wife actually helped hook that one out. Fortunately, she's left handed, which really helped when reaching past the various cables between the back and the spring connector in front.
My case mod was complete! I had taken my already overclocked power machine and customized it to express my inner creativity. For a moment, I was content. After a week or two, the pangs of desire began again and I started eyeing that old Packard Bell that used to belong to my sister . . .
Back to case modifications
None More Black
"It goes to eleven"
front view
side view