|
|
It began with a trip to Fred Meyers, as Jamie...
June 30, 2008 by Adam in Adam's Projects
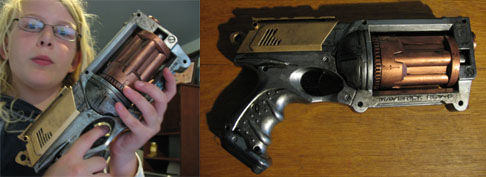 It began with a trip to Fred Meyers, as Jamie need to pick up some miscellaneous things and she left me with the kids. As we wandered the toy section, killing a half an hour, I noticed the Nerf weaponry was on sale. Soon enough, we slyly tossed a Nerf pistol and a couple packages of glow-in-the-dark darts into her basket. It began with a trip to Fred Meyers, as Jamie need to pick up some miscellaneous things and she left me with the kids. As we wandered the toy section, killing a half an hour, I noticed the Nerf weaponry was on sale. Soon enough, we slyly tossed a Nerf pistol and a couple packages of glow-in-the-dark darts into her basket.
When we arrived home, Sam and Emma ran around playing with it. In particular, he liked the rotating barrel and satisfying cocking mechanism.
Once I pried it out of his hands, I sanded off the identifying marks, spray painted, and did my usual hand painting to make it look properly dirty and aged. It turned out exceptionally well, especially with the glowing darts. Very Steampunk, needless to say.
|
|
My family decided there was a special place i...
June 26, 2008 by Adam in Adam's Projects
 My family decided there was a special place in Hell reserved for people who abuse antiques. Sam wanted to go antique shopping with Jamie. Since I was sick and wanted to "get the stink blown off me", I tagged along. While there, I found an antique slide library made by Bausch and Lomb that looked exactly like a book with a ship on the front. Seeing a price tag of only $15, I bought it on the spot. My family decided there was a special place in Hell reserved for people who abuse antiques. Sam wanted to go antique shopping with Jamie. Since I was sick and wanted to "get the stink blown off me", I tagged along. While there, I found an antique slide library made by Bausch and Lomb that looked exactly like a book with a ship on the front. Seeing a price tag of only $15, I bought it on the spot.
Later I ripped out all the slide holders and carefully cut a hole in the back. I disassembled my portable hard drive and it all nicely fit. Now I'm gluing everything over night and come morning it should be ready enough to haul to work. Even better, the power cord fits nicely inside.
I need to secure it better and there's also a glowing light that shows drive activity. I'm sorely tempted to make a strip in the front with clear letters or symbols and have the light show through.
|
|
The Audioscope is pretty much done at this point
June 23, 2008 by Adam in Adam's Projects
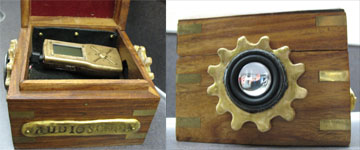 The Audioscope is pretty much done at this point. I screwed in a leather holder for the MP3 player, hiding the ugly wires. Sam came up with a great idea to make gear-like holders for the speakers. They're made from Sculpey, baked, and painted with assorted gold and black paints. The amplifier part of the component stopped working, but the speakers are great. Sam listened to old radio broadcasts of The Shadow last night in his room. The Audioscope is pretty much done at this point. I screwed in a leather holder for the MP3 player, hiding the ugly wires. Sam came up with a great idea to make gear-like holders for the speakers. They're made from Sculpey, baked, and painted with assorted gold and black paints. The amplifier part of the component stopped working, but the speakers are great. Sam listened to old radio broadcasts of The Shadow last night in his room.
I did some more work on the keyboard, making holes for the key posts in the vinyl. Drilling holes failed horribly, wrecking the surrounding vinyl. I tried a Dremel to sand off the vinyl stretched over the holes, but that was fairly rough. My best result was with an Exacto knife and small scissors, making a rough square-shaped holes. Fortunately the material stretches so well that it didn't matter. My next step is to paint the white plastic black so it goes well with everything else.
I'll try to post some pictures when I get home tonight.
|
|
One of the items that seems to come up regula...
June 22, 2008 by Adam in Adam's Projects
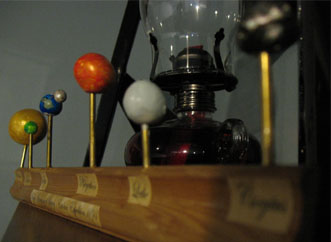 One of the items that seems to come up regularly in Steampunk building projects is that of the orrery. While it would take far too much time to make some elaborate system of gears to turn the planets around a sun, I ended up doing something much simpler with the same concept. One of the items that seems to come up regularly in Steampunk building projects is that of the orrery. While it would take far too much time to make some elaborate system of gears to turn the planets around a sun, I ended up doing something much simpler with the same concept.
Sam and I were playing with Sculpey and I said, "let's make planets". Pretty soon I had baked and colored planets resting on little brass posts. I took some wood trim, drilled holes, and varnished it for the stand. Towards the end of the day I made a label reading "Royal Astronomical Society - Eridani Expedition 1893", added planet names, and glued them on.
Now it looks like part of a secret history expedition to the stars. It seems quiet appropriate next to my framed advertisement for rayguns.
The new Audioscope is almost finished. I've taken out the light, as something went horribly wrong with the amplifying portion of the electronics. Fortunately the new speakers work great with the mp3 player alone. The only task left to do is to tack down a leather cradle to hold the player and hide the speaker wires.
|
|
I did a little more work on the Audioscope ye...
June 18, 2008 by Adam in Adam's Projects
I did a little more work on the Audioscope yesterday, drilling bigger holes for the speakers, putting in holes for wires, soldering wires, and generally trying to get everything to fit properly. I'm thinking I'll end up disassembling a lot of the work I've already done. I suppose that if it's in the name of art, everything's fair.
|
|
Sam and I made some huge progress with the St...
June 16, 2008 by Adam in Adam's Projects
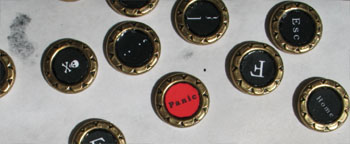 Sam and I made some huge progress with the Steampunk keyboard. It was a day filled with sorrow and jubilation, as we had some great successes and a few catastrophic failures. Sam and I made some huge progress with the Steampunk keyboard. It was a day filled with sorrow and jubilation, as we had some great successes and a few catastrophic failures.
First off, we cut out all the letters, glued them into the buttons, and put on a thick layer of lacquer. Unfortunately when we saw the final result this morning, the black ink had bled into lacquer and the letters were virtually unreadable. Sobbing at the hours of work, we ripped out the letters and started again with plain buttons.
This time we tested a single button with a spray of polyurethane, which turned out much better. We ended up cutting out every button, inking the edges, and using the spray for all of them. It took hours, but the results were great.
The next step was to glue them on the pegs the keys rested on. I decided on gluing them in-place, just to make sure we didn't miss any key and we got them on straight. It was a good idea in some regards, as we found we missed a keys and had to reprint one. Later when removing the keys so we could get the base looking good, I discovered several keys had become superglued to the base.
It was very frustrating, but I was able to remove most of them with careful use of brute force. Unfortunately the L was permanently affixed. I ripped off the key and drilled out the base, swapping with a good base for a key I never press. Eventually every key but one was finished, though there was definitely suffering along the way. Now I'm thinking of how to handle the space bar. Currently I'm slowly cutting one out of brass with a Dremel, but it's slow going.
In other Steampunk news, I ordered a tiny pair of speakers for use with a Creative mp3 player. The evil marketing people had carefully made it so it can only plug into the speaker jack of their products. Fortunately fifteen minutes with a Dremel fixed that. I haven't put it into the Audoscope yet in any pretty way, but I hooked it up to the mp3 player and the sound is great. The current underpowered headphones should be nicely amplified, making it actually practical.
|
|
I continue to do a little steampunk work ever...
June 12, 2008 by Adam in Adam's Projects
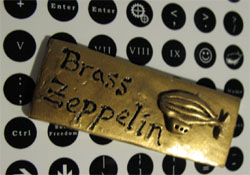 I continue to do a little steampunk work every day, it seems. Last week I made a fun little "Brass Zeppelin" plaque out of Sculpey and spraypaint. I'm not sure what I'll do with it, but I was thinking I should come up with an imaginary company name. I decided that the Brass Zeppelin Trading Company summed up the key steampunk elements nicely. I continue to do a little steampunk work every day, it seems. Last week I made a fun little "Brass Zeppelin" plaque out of Sculpey and spraypaint. I'm not sure what I'll do with it, but I was thinking I should come up with an imaginary company name. I decided that the Brass Zeppelin Trading Company summed up the key steampunk elements nicely.
The buttons arrived yesterday and I cheerfully discovered that they should work great for the keyboard project. If you look at the screenshot, you'll see the letters and symbols I printed out to go inside the buttons. I started cutting them out with scissors, but quickly realized that I probably need to make a 3/8" hole punch if I want to get it done this century.
The vinyl also showed up. It's an unusual material, though I think it'll work for my project. It's surprisingly stretchy, and I'm trying to figure out how to best use it. Sam wants to make a vest with the left over parts. We'll see how that turns out.
I can tell that I'm going to need my dad's help soon. I'm running into limits that require a full machine shop.
|
|
The crazy steampunk keyboard project continues
June 06, 2008 by Adam in Adam's Projects
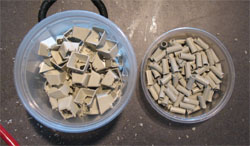 The crazy steampunk keyboard project continues. The crazy steampunk keyboard project continues.
Yesterday Sam and I finished up the rest of the keys. I had some free time after dinner, so I cut the tops off with a Dremel and made a big pile for Sam and I to clean up before his bedtime. He'd pop the tops off that were still dangling by a few threads and then I'd clean up the rough parts of the plastic. Pretty soon we had a pile of garbage and a pile of key bases.
I noticed there were slight differences between the key bases. We'll probably have to sort them out before we stick buttons on. Speaking of which, I ordered 110 brass buttons that I hope will work along with a bunch of vinyl. I'm nervous about the button sizes, though theoretically the dimensions will work.
|
|
After falling in love with the steampunk keyb...
June 03, 2008 by Adam in Adam's Projects
 After falling in love with the steampunk keyboards, I took the first baby steps to making my own. Emma helped me disassemble an ancient HP keyboard. All that remains are the electronics, keys, and the big piece of plastic the keys go into. Emma helpfully gathered up all the keys in a big container as I popped them out. After falling in love with the steampunk keyboards, I took the first baby steps to making my own. Emma helped me disassemble an ancient HP keyboard. All that remains are the electronics, keys, and the big piece of plastic the keys go into. Emma helpfully gathered up all the keys in a big container as I popped them out.
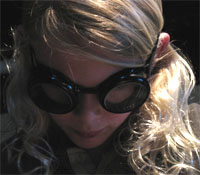
Later that evening, Sam donned the safety goggles Sadie bought and I taught him how to cut the keys apart with a Dremel. All we want is the post so that later we can glue new keys on. I think we managed to get eight done, with a little under a hundred to go.
|
|
Older Posts
|
|